Beyond the Filter: 7 "Fake But Real" Photo Spots Locals Don't Want You to Know
I remember scrolling through my feed late one night, mindlessly double-tapping, when I stopped dead. A friend had posted a photo that looked like it belonged in a sci-fi movie – towering, ethereal peaks shrouded in mist, seemingly floating above the clouds. "No way," I muttered, zooming in, convinced it was a digital rendering or some elaborate composite. I even messaged him, half-joking, "Dude, what filter is that? Did you finally learn Photoshop?"
His reply? "No filter. No Photoshop. Just... China."
My jaw dropped. That single image ignited a new quest: to find the world's most unbelievable, real-life photo spots. The kind of places that defy belief, where reality bends, and every frame looks like a masterpiece of digital art, yet it's all gloriously, genuinely real. And here’s the kicker: many of these places are so mind-bogglingly beautiful, so delicately perfect, that locals often prefer to keep them out of the mainstream tourist gaze. They want to preserve the magic, the quiet, the sheer unadulterated wonder.
But I'm a travel blogger. My job is to share the magic. So, after countless hours of research, whispered conversations with local guides, and a few epic adventures (and misadventures!), I've curated a list of 7 "fake but real" photo spots that will blow your mind and fill your camera roll with images straight out of a dream. These aren't just pretty places; they're experiences that challenge your perception of reality. And yes, I'm also going to share some insider tips on how to capture their essence, often by sidestepping the usual tourist routes, just like a local would.
Ready to dive into the surreal? Let's go!
1. Salar de Uyuni, Bolivia: Where the Sky Meets the Earth (Literally)
Imagine walking on clouds. Or perhaps, walking through the sky, with fluffy white wisps above and below you. That's Salar de Uyuni during the rainy season (roughly December to April). This vast, ancient salt flat transforms into the world's largest natural mirror, reflecting the heavens so perfectly that the horizon disappears. It's disorienting, breathtaking, and utterly, wonderfully fake-looking.
My first time there, I felt like I'd stepped onto another planet. Our jeep, a tiny speck in the endless white, seemed to float. I remember laying flat on the salt, camera pointed up, and feeling completely enveloped by the sky. It was a moment of pure, unadulterated awe.
Why it looks fake: The sheer scale of the reflection, the perfect seamlessness between sky and ground, makes your brain struggle to comprehend it. It looks like a digital background or a green screen.
The Local Secret: Most tourists flock here for a 3-day jeep tour from Uyuni. While these are fantastic, truly getting away from the crowds means going deeper, perhaps opting for a private tour that ventures further into the lesser-explored sections or combining it with a stay in one of the unique salt hotels. Ask your guide to take you to specific "reflection spots" known only to them, especially away from the main thoroughfare. For the ultimate 'locals know' experience, seek out a guide who can take you to an area where the salt forms perfect hexagons in the dry season, a mesmerizing pattern often overlooked for the mirror effect.
Pro Photo Tips:
- Rainy Season (Dec-Apr): Essential for the mirror effect. Even a few inches of water are enough.
- Perspective Play: Bring props! Toy dinosaurs, miniature cars, even your friends can be used for incredible forced perspective shots against the vast backdrop.
- Golden Hour: Sunrise and sunset create unbelievably vibrant reflections.
- Waterproof Your Gear: Saltwater isn't camera-friendly.
- Tripod: Absolutely essential for sharp reflections and low-light shots.
Cost: 3-day tours typically range from $150-$250 USD, excluding park fees (~$22 USD).
2. Zhangjiajie National Forest Park, China: The Real "Avatar" Mountains
Remember those floating mountains in James Cameron's Avatar? They were inspired by Zhangjiajie. This place is not just "fake but real"; it's otherworldly. Towering sandstone pillars, cloaked in lush vegetation, pierce through the mist, creating a landscape that genuinely looks like concept art brought to life. It feels like a forgotten realm, a place where dragons might still soar.
I spent a week here, hiking through valleys, riding glass elevators up sheer cliffs, and crossing nerve-wracking glass bridges. Every turn presented a view more unbelievable than the last. There was one morning, after a light rain, when the mist rolled in, and the peaks truly seemed to detach from the earth. My camera couldn't capture the feeling of vertigo and wonder simultaneously.
Why it looks fake: The sheer height and unique pillar formations, combined with the frequent mist, make it appear as if the mountains are suspended in the air, defying gravity and logic.
The Local Secret: This park is massive, and most tourists stick to the main viewpoints. To avoid the crushing crowds, especially at the Hallelujah Mountain (the Avatar inspiration), visit during the shoulder seasons (spring or late autumn) or very early in the morning. Explore the Golden Whip Stream area for a tranquil walk beneath the peaks, or take the less-frequented cable car up Tianzi Mountain for different perspectives. Many locals prefer the quieter trails around Yuanjiajie or the slightly more challenging paths in the Yellow Stone Village (Huangshizhai).
Pro Photo Tips:
- Wide-Angle Lens: Crucial to capture the immense scale of the pillars.
- Patience for Mist: While mist can obscure, it also creates that magical "floating" effect. Wait for it to clear slightly, or embrace the ethereal mood.
- Telephoto Lens: Useful for compressing distant peaks and capturing details.
- Cable Cars & Elevators: Offer unique aerial perspectives. Don't be afraid to shoot through the glass (clean it first!).
Cost: Entrance ticket for 4 days is around 245 CNY (~$35 USD). Cable car rides and the Bailong Elevator are extra.
3. Benagil Cave, Algarve, Portugal: Nature's Own Skylight
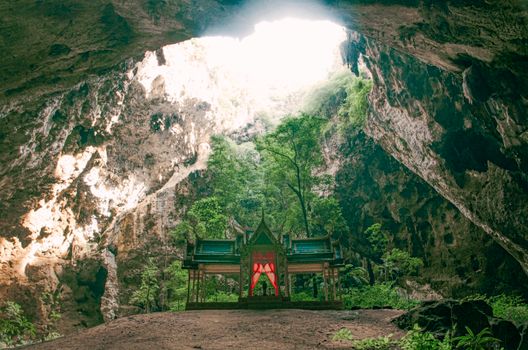
Imagine a hidden beach, accessible only by sea, inside a magnificent sea cave. Now, imagine a giant hole in the cave's ceiling, letting in a perfect beam of sunlight that illuminates the golden sand and turquoise water below. That's Benagil Cave, and it looks like a scene crafted by a master architect, not by millennia of crashing waves.
My first encounter with Benagil was via kayak. Paddling into that cavern, the roar of the ocean outside fading to a hushed echo, and then seeing that perfect, circular skylight above – it was like discovering a sacred, hidden chamber. The light played on the water, creating dancing reflections, and for a moment, I felt completely alone in a natural cathedral.
Why it looks fake: The perfectly circular opening, the way the light falls, and the serene beach within, all combine to create a scene that feels too perfect to be natural. It looks like a CGI rendering of a dream beach.
The Local Secret: This spot is wildly popular, leading to crowded boat tours. The real local secret is to go early in the morning (before 9 AM) and rent a kayak or stand-up paddleboard from nearby beaches (like Benagil Beach itself or Praia da Marinha). This allows you to enter the cave independently (weather permitting), spend more time inside, and capture those crowd-free shots. Locals also know that exploring the coastline by kayak reveals many other smaller, equally stunning (and less crowded) sea caves.
Pro Photo Tips:
- Go Early: Beat the crowds for unobstructed shots.
- Waterproof Protection: Essential for your camera if you're kayaking/paddleboarding.
- Wide-Angle Lens: To capture the entire cave and the skylight.
- Long Exposure (with tripod): If you're stable enough, a long exposure can smooth out the water, giving it a glassy, ethereal look.
- Golden Hour: The light entering the cave during sunrise or sunset is incredibly soft and warm.
Cost: Kayak/SUP rentals start from €20-€30 for 2-3 hours. Boat tours are also available for similar prices but offer less flexibility.
4. Hitachi Seaside Park, Japan: Fields of Unbelievable Color
Japan is known for its meticulous gardens and seasonal beauty, but Hitachi Seaside Park takes it to another level. Depending on the season, vast hillsides transform into monochromatic carpets of vibrant flowers – electric blue nemophila in spring, fiery red kochia bushes in autumn, or brilliant yellow narcissus. The sheer scale and uniformity of the planting make it look less like nature and more like a perfectly designed, impossibly vibrant landscape from a fantasy game.
I visited during the nemophila season, and the "Miharashi Hills" were a sea of cerulean blue stretching to the horizon. It was so intense, so uniformly beautiful, that my eyes struggled to believe it wasn't a giant, living painting. People were gasping, laughing, and just soaking it all in. You literally become part of the art.
Why it looks fake: The massive, perfectly manicured fields of single-color flowers or plants create an almost artificial, overwhelming visual impact. It looks like a digital texture applied to a landscape.
The Local Secret: The park is famous, so crowds are inevitable during peak bloom. Locals often check the park's official bloom calendar religiously and plan their visits for weekdays, or even during slightly off-peak times within the season. They also know that while Miharashi Hills are the main draw, other smaller, equally stunning flower fields exist within the park and are often less crowded. For a truly authentic experience, combine your visit with a trip to nearby fishing villages for fresh seafood.
Pro Photo Tips:
- Check Bloom Calendar: Absolutely crucial. The park website provides detailed updates.
- Wide-Angle & Telephoto: Use wide-angle for the sweeping scale, and telephoto for compressing the flowers into an even denser, more vibrant carpet.
- Low Angle Shots: Get down among the flowers to create an immersive perspective.
- Look for Pathways: Utilize the designated paths to create leading lines in your compositions.
- Dress to Complement: Wear colors that will pop against the dominant flower color.
Cost: Entrance fee is typically around 450 JPY (~$3 USD).
5. Jökulsárlón Glacier Lagoon & Diamond Beach, Iceland: Ice Gems on Black Sand
Iceland is a land of extremes, and Jökulsárlón Glacier Lagoon and its adjacent Diamond Beach are prime examples. Here, colossal icebergs calve from a glacier, drift through a lagoon, and eventually wash up on a black volcanic sand beach. The result is a surreal landscape of glistening, sculpted ice chunks – ranging from sapphire blue to crystal clear – scattered like giant diamonds on an inky canvas. It's breathtakingly beautiful and looks like a set from a blockbuster sci-fi film.
I remember standing on Diamond Beach, the wind whipping around me, watching waves crash over these magnificent ice sculptures. Each piece was unique, carved by nature, and slowly melting back into the ocean. It felt like walking through a gallery of frozen art, each piece more stunning than the last. The contrast of the black sand and the impossibly blue ice was something my eyes had never processed before.
Why it looks fake: The striking contrast between the pristine, often vibrant blue ice and the jet-black sand, coupled with the otherworldly shapes of the icebergs, makes it appear like a digitally enhanced scene.
The Local Secret: Most tour buses stop at the main viewing areas. To truly immerse yourself and get unique shots, walk further down Diamond Beach, away from the car park. You'll find more untouched ice formations and fewer people. For the lagoon, consider taking a zodiac boat tour to get closer to the icebergs (these are often smaller groups than the amphibian boats). Locals also know that sunsets and sunrises here are particularly spectacular, casting warm hues over the ice, and offering a quieter experience.
Pro Photo Tips:
- Wide-Angle Lens: To capture the vastness of the lagoon and the scattered icebergs on the beach.
- Tripod: Essential for long exposures, especially at sunrise/sunset, to smooth the water or capture the movement of waves over the ice.
- Polarizing Filter: Helps reduce glare on the ice and water, enhancing color saturation.
- Focus on Details: Don't just shoot wide; get close to the icebergs to capture their intricate textures and colors.
- Dress Warm: Even in summer, it can be very cold and windy.
Cost: Free to visit the lagoon and beach. Glacier boat tours range from 6,000-10,000 ISK (~$45-$75 USD).
6. Antelope Canyon, Arizona, USA: Liquid Sandstone & Light Beams
Stepping into Antelope Canyon is like entering a dream. This slot canyon, carved by millennia of water and wind, features swirling, undulating sandstone walls that glow with impossible shades of orange, red, and purple. When the sun is high, beams of light penetrate the narrow openings above, creating ethereal columns of illumination that dance through the dust-filled air. It's an optical illusion, a natural art gallery, and looks utterly Photoshopped.
My first time in Lower Antelope Canyon, I was mesmerized. The Navajo guide, a true artist with light, would point out formations – a lion's head, an eagle's wing – and show us how the light changed everything. I felt like I was inside a giant, swirling painting, constantly shifting and revealing new wonders. The way the light played off the curves felt almost liquid.
Why it looks fake: The smooth, flowing lines of the sandstone, combined with the dramatic shifts in color and the almost theatrical light beams, make it appear like a digitally rendered abstract artwork.
The Local Secret: Antelope Canyon is on Navajo land, and you must visit with a certified Navajo guide. There are two main sections: Upper and Lower. Upper is famous for its powerful light beams but can be incredibly crowded. Lower Antelope Canyon, while requiring more climbing (ladders), often offers a more intimate experience with fewer crowds and equally stunning light effects. Locals might suggest booking the first or last tour of the day for softer light and fewer people.
Pro Photo Tips:
- Wide-Angle Lens: Essential for capturing the towering, curving walls.
- High ISO: The canyon is dark, so be prepared to bump up your ISO.
- Dust Protection: The fine sand can get everywhere. Protect your camera.
- Look Up: The light beams are a major draw; compose your shots to include them.
- Tripod (Upper Canyon only): Some tours allow tripods in Upper Antelope Canyon for longer exposures, but check beforehand. Lower Canyon tours are faster-paced.
- Listen to Your Guide: They know the best spots and angles for photos.
Cost: Tours typically range from $60-$100 USD per person, including permits and guide fees.
7. Pamukkale, Turkey: The Cotton Castle Terraces
Imagine stepping into a landscape made of clouds, where pristine white terraces overflow with impossibly blue, mineral-rich thermal waters. That's Pamukkale, meaning "cotton castle" in Turkish, and it's a UNESCO World Heritage site that truly lives up to its name. The terraced pools, formed by calcium deposits over millennia, shimmer under the sun, creating a scene that looks like something out of a fantasy novel or a highly stylized advertisement.
When I first saw Pamukkale from a distance, it looked like a snow-capped mountain range in the middle of a hot, dry landscape. Up close, dipping my feet into the warm, milky blue water, it felt surreal. The travertine formations were surprisingly textured, and the contrast of the pure white against the vibrant blue was almost too perfect. I remember thinking, "This can't be real life."
Why it looks fake: The brilliant, almost artificial white of the travertine terraces, combined with the vibrant, milky blue of the thermal pools, creates a stark, dreamlike contrast that looks like a painting or a digitally enhanced image.
The Local Secret: Pamukkale is popular, but many tourists stick to the main designated bathing areas. To find more secluded spots and truly appreciate the natural beauty, walk further along the terraces (barefoot, as shoes are prohibited to protect the formations). Visiting early in the morning or late afternoon provides softer light for photography and fewer crowds. Locals also know that combining a visit to Pamukkale with the ancient ruins of Hierapolis, located directly above the terraces, offers a richer historical and visual experience.
Pro Photo Tips:
- Polarizing Filter: Excellent for reducing glare on the water and making the blue pop.
- Drone Shots (where permitted): Offer an incredible aerial perspective of the terraces (check regulations beforehand).
- Wide-Angle Lens: To capture the vastness of the white formations and the terraced pools.
- Barefoot: Be prepared to walk barefoot; it's required to protect the delicate travertine.
- Golden Hour: The low sun casts beautiful, soft light and long shadows across the terraces.
Cost: Entrance fee to Pamukkale and Hierapolis is around 200 TL (~$7 USD).
---
Beyond the Lens: Responsible Travel & Local Secrets
These places are truly extraordinary, so much so that they can feel like glitches in the matrix, defying our understanding of natural beauty. But with great beauty comes great responsibility. The "locals don't want tourists to know" angle isn't about being exclusive; it's about respectful, sustainable travel. It's about seeking out authentic experiences that minimize your impact and maximize your connection to the place.
Here are some overarching tips to keep in mind when chasing these unbelievable photo ops:
- Respect Local Guidelines: Many of these sites are fragile or culturally significant. Follow all rules, stay on designated paths, and don't touch or disturb natural formations.
- Support Local Businesses: Choose local guides, eat at local restaurants, and buy from local artisans. Your money directly benefits the communities who protect these treasures.
- Travel During Shoulder Seasons: This is often the best "local secret" – fewer crowds, often better weather, and a more authentic experience.
- Leave No Trace: Pack out everything you pack in. Leave the place as beautiful, or even more beautiful, than you found it.
- Be Patient: The best shots often require waiting for the perfect light, for people to clear, or for that fleeting moment of magic.
Your Next Instagram-Breaking Adventure Awaits!
There you have it – seven places on Earth that look so unreal, you'll question your own eyes. These are the spots that separate the casual traveler from the true adventurer, the places that promise not just a photo, but an unforgettable story. They're a testament to the incredible, artistic power of Mother Nature, proving that sometimes, reality is far more astounding than anything we could ever imagine.
So, ditch the filters, pack your bags, and get ready to capture some truly "fake but real" moments. Your followers won't know what hit them!
Which of these "fake but real" spots is topping your bucket list? Or do you know another secret spot that defies belief? Share your thoughts and photos with us on social media using #TripsoraUnreal and let's inspire each other to explore the unbelievable!
---