The first time I saw the Northern Lights, it was a chaotic blur of green light and flailing selfie sticks. I was crammed onto a freezing bus in Iceland, surrounded by a hundred other tourists, all pointing their phones at the sky, hoping for a miracle. The aurora danced, yes, but my photos? They were grainy, distant blurs that did zero justice to the ethereal spectacle unfolding above. I left disappointed, my camera bag feeling heavier with the weight of missed opportunities.
"You're doing it wrong," a gruff but kind voice said to me later that week in a tiny, remote guesthouse. It was Gunnar, a local fisherman with eyes that had seen more auroras than most people had seen sunsets. He saw my expensive camera gear and my frustrated face. "You chase the lights with everyone else, you get the same photos as everyone else. The real magic? That's for those who know where to look, and how to see."
That conversation changed everything. Gunnar, and others like him I met on subsequent trips, shared insights that tour operators don't advertise and guidebooks often miss. They revealed the subtle nuances, the hidden spots, the precise techniques that elevate a casual viewing into a photographic triumph. This isn't just about settings; it's about an approach, a philosophy, a way of being with the aurora. And today, I’m sharing those "local secrets" with you.
---
1. Ditch the Tour Bus: Embracing the Solitude of the Hunt
This is perhaps the most fundamental "secret" locals live by: the best aurora experiences, and thus the best photos, rarely happen from a crowded tour bus stop. Why? Because tour operators go where it’s convenient, accessible, and safe for large groups – which often means light pollution, limited vantage points, and a general lack of magic.
The Local Approach: Locals know that chasing the aurora is an intimate dance between patience and pursuit. It means being nimble, being flexible, and being willing to drive a little further.
- Rent a 4x4, Not a Seat: If you’re serious about aurora photography, rent a sturdy 4x4 vehicle. This is non-negotiable in places like Iceland, Norway, or Alaska, especially in winter. It allows you to navigate unpaved roads, find those secluded spots away from artificial light, and escape unexpected cloud cover. Imagine pulling off onto a quiet, snow-covered track, the only sound the crunch of your boots as you step out into the vast, silent wilderness. That’s where the magic begins.
- Embrace the "Dark Sky" Apps: Forget just looking up. Locals use apps like "Light Pollution Map" or "Dark Sky Map" to pinpoint truly dark zones. Cross-reference this with cloud cover apps (like "Ventusky" or local meteorological services) and, crucially, aurora forecast apps (e.g., "My Aurora Forecast" or "Space Weather Live"). A local once told me, "The best forecast is often the one you make yourself by combining all the pieces."
- Befriend a Local (or Act Like One): This isn't about asking for secret coordinates directly. It's about engaging. Stay at small guesthouses, eat at local diners, strike up conversations. Ask about local weather patterns, "Are there any good spots around here that avoid the town lights?" or "Where do you go when you want to really see the stars?" You'd be surprised how often a casual chat can lead to invaluable, off-the-beaten-path advice. One time in Finnish Lapland, a café owner drew me a crude map to a frozen lake I never would have found – it became the backdrop for my favorite aurora shot of that trip.
Budget Tip: Renting a car might seem more expensive than a bus tour initially (expect €60-€150/day for a 4x4), but when you factor in the freedom, flexibility, and potentially multiple nights of aurora hunting, it often provides far greater value and photographic opportunities than paying for individual tours (€80-€150 per person per tour).
---
2. Your Camera is a Brush: Mastering the Technical Canvas
Locals don't just point and shoot; they understand their camera as an extension of their eye. They know that even a modest DSLR or mirrorless camera, when paired with the right settings and accessories, can capture the aurora's splendor far better than any phone.
The Essential Gear (No Excuses!):
- Sturdy Tripod: This is your anchor. No tripod, no sharp aurora photos. Period. The aurora moves, but your camera shouldn't.
- Wide-Angle Lens (f/2.8 or wider): The wider the aperture (smaller f-number), the more light your lens can gather, which is crucial in the dark. A 14mm-24mm lens on a full-frame camera (or equivalent on crop sensor) is ideal to capture the vastness of the sky.
- Remote Shutter Release (or 2-second timer): Touching your camera to press the shutter can introduce shake. A remote release or the camera's self-timer ensures crispness.
- Extra Batteries (and keep them warm!): Cold drains batteries faster than you can say "aurora borealis." Keep spares in an inside pocket, close to your body heat.
- Headlamp with Red Light Mode: White light ruins night vision for you and others. Red light is your friend.
- Warm Clothes: This isn't gear for your camera, but for you. You can't focus on your shots if you're shivering uncontrollably. Layers, thermal underwear, thick socks, waterproof outer shell, hat, gloves – dress like you're going to the Arctic, because you are.
The "Local Settings" Playbook:
- Manual Mode (M): Take control. Auto modes will fail you.
- Aperture (f-stop): Set it as wide open as your lens allows (e.g., f/2.8, f/3.5, f/4). This lets in maximum light.
- ISO: Start around ISO 1600-3200. Adjust up or down based on aurora brightness. Brighter aurora? Lower ISO. Fainter? Higher ISO (but beware of noise). This is often the most variable setting. Gunnar taught me to "dance with the ISO" – constantly adjusting based on the aurora's intensity.
- Shutter Speed: This is where the aurora's movement comes into play.
- Fast-moving, intense aurora: 5-15 seconds. You want to "freeze" the movement.
- Slow-moving, faint aurora: 15-25 seconds. This allows more light to gather. Anything longer than 25-30 seconds risks star trails (unless that's your artistic intent).
- Focus: Manual to Infinity: In the dark, autofocus will hunt fruitlessly. Switch to manual focus. For distant stars and aurora, set your lens to infinity. If your lens has a focus scale, look for the infinity symbol (∞). If not, focus on a distant light (like the moon or a far-off streetlight) in live view, zoom in to check sharpness, then switch to manual focus and don't touch it. I learned this the hard way, with a whole night of blurry shots because I trusted autofocus.
- White Balance: Auto white balance can be inconsistent. Set it manually to a Kelvin temperature between 3200K and 4000K for a natural, cool blue-green tone. Or, shoot in RAW and adjust later.
- Shoot in RAW: Always. This gives you maximum flexibility in post-processing without losing image data, crucial for tweaking exposure and colors.
---
3. Timing is Everything (Beyond the Kp-Index)
You’ve checked the Kp-index, you know the aurora is predicted to be active. But locals know it's not just about solar activity; it’s about the perfect storm of factors that align to create those truly unforgettable moments.
The "Local" Timing Factors:
- Cloud Cover is the Enemy: A high Kp-index is useless if thick clouds blanket the sky. Use local weather forecasts, satellite imagery (like "Yr.no" in Norway or "Veður" in Iceland), and especially local webcams to find clear patches. A local in Lofoten, Norway, once showed me how to use mountain webcams to identify gaps in cloud cover that weren't visible from sea level. "The mountains push the clouds around," he explained. "You find the gaps."
- Moon Phase Matters: A full moon can drastically wash out fainter aurora displays. While a crescent moon or half-moon can add beautiful illumination to your foreground, aim for the new moon period for the darkest skies and most vibrant aurora. Check a moon phase calendar before your trip.
- Local Microclimates: Weather can be highly localized. One valley might be socked in, while the next fjord over is perfectly clear. This is where having your own transport becomes invaluable. Don't be afraid to drive an hour or two in search of clearer skies.
- The "Aurora Break": Sometimes, the aurora appears, then fades, then reappears stronger. Don't pack up after the first lull! Locals are patient. They wait it out, often with a thermos of hot coffee, knowing that the most spectacular displays can happen after a quiet period. My most incredible aurora experience came after two hours of staring at a barely-there glow, just as I was about to give up, it exploded across the sky.
---
4. Framing the Magic: Composition Secrets for Jaw-Dropping Shots
A photo of just the aurora, no matter how bright, can feel flat. Locals know that the true art lies in creating a compelling scene, not just capturing lights.
Beyond the Sky: What to Include:
- Foreground Interest: This is the game-changer. Don't just point your camera at the sky. Look for a captivating foreground:
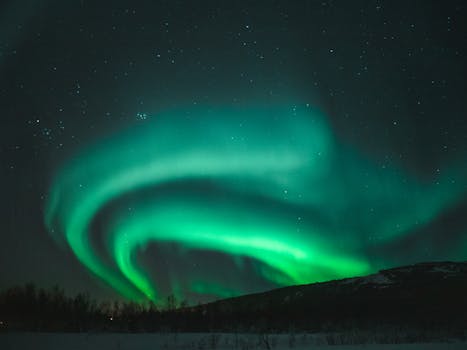
- Silhouettes: Stark trees, a lone cabin, a mountain peak, a frozen lake, or even your own silhouette (with a headlamp for a split second to light your face or body) can add immense depth.
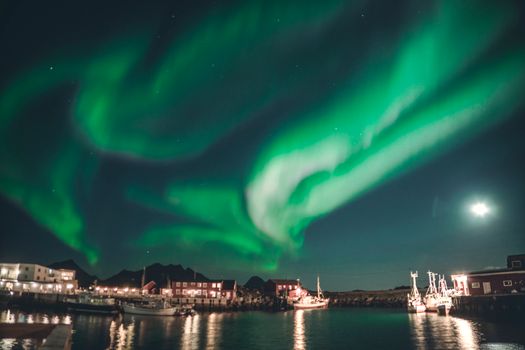
- Reflections: If you find calm water (a lake, a still fjord, a puddle), the aurora's reflection can double the impact of your shot.
- Local Landmarks: A traditional Icelandic turf house, a Norwegian fishing hut (rorbu), or an iconic mountain can ground your image and tell a story.
- Lead-in Lines: Use roads, fences, shorelines, or even trails of light from a distant car to draw the viewer's eye into the frame, leading up to the aurora.
- Rule of Thirds: Position your horizon (if visible) on one of the horizontal lines, and your main foreground element or the brightest part of the aurora on one of the intersecting points.
- Human Element (Thoughtfully): A tiny figure gazing up at the sky can convey the sheer scale and wonder of the aurora. Use a remote shutter and stand still for the duration of the exposure. A quick flash of a red headlamp can illuminate you just enough.
My Anecdote: I once spent an hour scouting a perfect spot in northern Sweden, not for the aurora itself, but for a cluster of snow-laden pine trees that would perfectly frame the sky. When the lights finally appeared, dancing above those ancient trees, it was a moment of pure photographic bliss. The foreground made the shot, not just the lights.
---
5. Beyond the Shot: Post-Processing for Perfection (Without Overdoing It)
Locals understand that photography isn't just about pressing the shutter; it's about refining the image to match the memory. But they also know the line between enhancement and artificiality.
The Subtle Art of Aurora Editing:
- Start with RAW: As mentioned, shooting in RAW gives you the most data to work with.
- Essential Adjustments (Lightroom/Photoshop/Affinity Photo):
- Exposure: Gently lift the overall exposure if the image is too dark.
- Contrast: Add a touch of contrast to make the aurora pop against the sky.
- White Balance: Fine-tune the Kelvin temperature to bring out those natural greens and purples. Avoid making it look too artificial blue or green.
- Highlights & Shadows: Recover detail in blown-out highlights (if any) and lift shadows to reveal foreground elements.
- Dehaze: A small amount of dehaze can add clarity and punch.
- Noise Reduction: High ISO shots will have noise. Apply noise reduction carefully – too much can smooth out detail.
- Sharpening: A subtle amount of sharpening can make the aurora feel crisper.
- The "Less is More" Philosophy: The biggest mistake tourists make is over-saturating the colors or cranking up the clarity too much, making the aurora look fake. Locals aim for a natural, ethereal glow. The aurora is often softer to the naked eye than it appears in photos, so aim for a realistic representation of its magic. Imagine you're enhancing a dream, not creating a cartoon.
---
6. Respect the Land, Respect the Locals: The Unwritten Code
This isn't a photography tip, but it's perhaps the most important "local secret" of all. The magic of the aurora exists in pristine, wild places. Locals are fiercely protective of their environment and their way of life.
- Leave No Trace: Pack out everything you pack in. Do not litter. Do not disturb wildlife. Stay on designated paths or, if you venture off-road, be incredibly mindful of fragile ecosystems. Off-roading on protected moss in Iceland, for example, is illegal and causes irreversible damage.
- Respect Private Property: Just because a spot looks perfect doesn't mean it's public land. Be aware of fences, signs, and farm boundaries.
- Be Mindful of Others: When you find your perfect secluded spot, it might not be entirely yours. If other aurora hunters arrive, be respectful. Don't shine your bright headlamp into their faces or their camera lenses. Keep noise to a minimum. Let everyone enjoy the quiet magic.
- Support Local Businesses: Instead of only big chains, spend your money at local guesthouses, restaurants, and small shops. These are the people who live in these communities year-round and whose knowledge you might indirectly benefit from. Buy that local coffee, get that handmade souvenir. It contributes to the preservation of the culture and environment you've come to enjoy.
---
7. Hidden Gems & Logistics: Where to Go (Without Giving Away the Exact Spot)
While I won't give you GPS coordinates to Gunnar's secret fishing hut, I can guide you on how to find similar spots and what to expect logistically.
- Look for "Dark Sky Parks" or Remote National Parks: These are officially designated areas with minimal light pollution. Examples include Abisko National Park in Sweden (famous for its "Blue Hole"), parts of Jasper National Park in Canada, or much of the interior of Iceland away from Reykjavik.
- Coastal Drives with Fjord Views: In Norway (Lofoten, Senja, Tromsø region) or Iceland (Snaefellsnes Peninsula, Eastfjords), drive along the coast. Look for pull-offs, small beaches, or quiet coves that offer an unobstructed view north over water, especially if there are interesting rock formations or a lone lighthouse. Water reflects the aurora beautifully.
- Forest Roads & Lakes: In Finland and Swedish Lapland, endless forest roads lead to frozen lakes. These offer incredibly dark skies and often beautiful tree-lined foregrounds. Research areas around Inari, Rovaniemi, or Kiruna.
- Alaskan Wilderness: Around Fairbanks, head out of town on routes like the Steese Highway or Chena Hot Springs Road. Look for designated pull-offs or areas away from major settlements. The vastness of Alaska means dark skies are abundant.
Logistics & Pricing (Approximate):
- Accommodation: Small guesthouses or cabins in remote areas (€80-€200/night) often put you closer to dark skies than city hotels.
- Food: Pack snacks, a thermos of hot drinks, and even a simple meal for your aurora chase. Remote areas have limited options, and you don't want to leave your spot for food.
- Fuel: Fill up your tank whenever you see a gas station in remote areas.
- Safety: Tell someone where you're going if you're venturing far off-road. Have a fully charged phone and consider a satellite messenger if you're truly in the wilderness.
---
The Final Secret: It's About the Experience
Gunnar's final lesson to me wasn't about settings or locations. It was about perspective. "You chase the lights with your camera," he said, "but you should also chase them with your eyes, with your heart. Sometimes, the best photo is the one you don't take, the one you just live."
The "local secrets" aren't just about getting a better photo; they're about fostering a deeper connection with the aurora, with nature, and with the communities that call these incredible places home. It’s about slowing down, being patient, and truly immersing yourself in the raw, untamed beauty of the Arctic night. When you do that, the incredible photos become a natural byproduct of an unforgettable experience.
So, pack your bags, charge your batteries, and prepare to see the Northern Lights not just as a tourist, but as someone who understands their magic, respects their environment, and captures their essence with the wisdom of a local.
Now it's your turn! Have you captured the Northern Lights? Share your favorite shot and your own "secret" tip in the comments below! Don't forget to tag @Tripsora on Instagram and use #TripsoraAurora for a chance to be featured. Bookmark this guide for your next Arctic adventure – your epic aurora photos await!
---